Monday, 31 March 2014

Gwendolen's Fairy Tale Dress

Gwendolen (Helen Kish doll Shea) looking beautiful.
I got a Shea at the beginning of the year! I wasn't going to buy a Shea because even though she's my favourite face mould , all the Shea's seem to have quite high colouring which makes them look like they're wearing make-up. That's not a moral thing, a these dolls are too young for make-up thing, I don't care about that. (Although I kind of feel that way about the fact most of them come in high heels, I'm 35 and I don't wear high heels as often as these dolls do!) It's more of an issue of the versatility of the doll. A kid doll with natural colouring looks equally at home in play clothes, party clothes, period clothes, whatever clothes. A  kid doll that looks like she's wearing make-up looks a bit funny in casual clothes and the more casual the clothes the funnier she looks. But then someone was selling a "Third times a charm" convention Shea (and "Wren Sugar Plum") and well . . . you know how it goes, I have two new dolls! (Actually three new dolls, got a secondary market "Debut Phoenix" since then. And yes, I rewigged him as a girl.)
Anyway, I saw this dress on Pinterest :
Dress from LACMA. I've found this dress tagged as being 1880s and 1890s.
Not sure when it's actually from but I'm guessing the girl's parents were following the aesthetic movement.
And I HAD to make it! And I really regret that. There's smocking on the skirt. I've always had the attitude that anyone can do almost anything if they try, and found it irritating when people say they can't do things that they've never tried to do. . . but for the record, I can't smock. I'm determined to learn but so far no amount of trying has made the slightest bit of difference. So my pattern has no smocking. Feel free to add some if you're good at that kind of thing though. Also if I were to make this dress again I think I would tack down the pleats in the front somehow. Once I had the dress on the doll, the pleats kept falling open, making the bodice look baggy, but I'm sure you can see that in the photos.
Also I want to apologize for the fact that the photos have turned out a little funny. The fabrics I used had a fairly high sheen and apparently don't photograph well.

Gwendolen (Helen Kish's Shea) full length
As you can see in the picture, the skirt, bodice and sleeves are all one fabric; the collar and cuffs are a second fabric; and the undersleeves, yoke and neck frill are a third fabric. There is a bow at the back which is made from the same fabric as the bodice and skirt.
First thing to do is to make the entire front bodice.
I've made the neck ruff as an entirely separate piece to the dress, so don't worry about that just yet.
Cut and line the yoke piece and the collar.
If you're making the collar out of velvet (like I did) don't line it with velvet, line it with a scrap of cotton or silk. (Although I was horrified when I realised the scrap of "artificial" silk I was using to line it was not actually artificial at all! I felt like I'd just wasted something precious!)
With right sides together sew the collar onto the yoke.
Cut and pleat the bodice, the area between the arrows on the pattern is the inside of the pleat (the bit you can't see).
Stitch the pleats into place across the top and the bottom and (as I wish I had) maybe tack them in place along their length.
Then sew the collar/yoke piece into the bodice. Don't worry if the collar sticks up a bit at this point, you can tack it down at the points later.

Next cut and line, hem or face the back bodice pieces. The overlap/wrap for back fastenings are included in the pattern piece, but not marked.
Sew the front and back bodices together along the shoulder seams.
Now put the bodice in a safe place while you make the sleeves.
Cut two sleeve pieces, two cuff pieces and two undersleeves.
Make a hem on one edge of the undersleeves. Make it wide enough that you'll be able to thread it with elastic, this is the lower edge.
Sew one edge of the cuff to the lower edge of the sleeve, with the right side of the cuff against the wrong side of the sleeve.
Fold the cuff back over the sleeve, so the wrong side of the cuff is now against the right side of the sleeve, tuck the edges of the cuff under and sew it down.
Then gather the undersleeve piece onto the lower edge of the sleeve.

Now to attach the sleeve to the bodice.
I didn't gather them. In the original picture it looks like the sleeves have been sewn straight onto the bodice with the excess pleated into the top of the sleeve where the shoulder seam is, so that's how I did it. You could gather them if you wanted, they'd be puffier. But I like them this way.

Next sew the side seams of the bodice and the seams on the sleeves. BUT before you finish the sleeve seams, thread elastic into the lower edge of the undersleeves and tie it off.

Try the bodice on the doll and if necessary tack the points of the collar down so they don't stick up.

Cut the skirt piece. Or pieces. I used a front piece and two back pieces simply because my fabric wasn't big enough to cut a single 80cm piece.
Line, face or hem the lower edge. I've discovered I prefer facing on dolls skirts. It's almost impossible to make a hem look neat in this size.
Then gather the skirt onto the bodice.

Finish the back opening and add fastenings.

But you're not finished yet!
There's more to come.

Gwendolen's fairy tale dress back view.
Cut the pieces for the sash. The two larger pieces then need to be doubled over and sewn into tubes along their longer side, then ironed flat. 
Take the bow piece and fold the two ends into the centre so that they overlap and sew together. 
To get the fringes you may be able to just fringe the ends of your fabric. I wasn't so lucky. I was using a pretty cheap polyester that had no intention of fringing at all. So I cut two scraps of silk 6cm square, folded them double and zigzag stitched them along one end. Then I frayed the rest of the silk by pulling out the crossways threads nearly up to the zigzagging. Then I tucked the zigzagged part inside the open end of the sash and stitched it closed.
Pleat the bow centre with your fingers, you can put a stitch or two in if it's easier, then attach the centre (or not quite centre) of the tails to the centre of the bow. (I made mine slightly off centre for realism)
fold under the edged of the small sash piece  and iron flat. wrap this piece around the centre of the two larger pieces and sew closed. Then attach the sash to the back of the dress.

AND of course the neck ruff!
Cut the neck ruff piece.
Double it over, right sides together and sew along the long side into a tube.
Turn it in the other way.
Turn the ends in.
Stitch a second line about half a centimetre in from the seam. This is the casing for a ribbon.
Stitch the ends closed, EXCEPT on the casing.
Run baby ribbon through the casing.
Pull the ribbon up so it's the right length to fit around the doll's neck (test on the doll of course!)
Tack the ribbon into place at these points and cut off the tails to the length you want them.

And NOW you're finished! If you're like me at this point you'll need a nice sit down and a cup of tea, while you decide whether to feel proud or cry for a while.

Seriously, making this dress was the most emotionally scarring sewing project of my life! And that is only a slight exaggeration!

And now the pattern and then some more pictures of the finished product.


And she looks so lovely, maybe it was worth the almost nervous breakdown it caused!

Gwendolen looks like a character from a nursery rhyme or fairy tale.

Except for the scrap of cotton she has stuck to her sleeve!
"Would you RELAX it's just a dress!" 
Gwendolen is unsympathetic to my stress over making this dress.


Shoes are MSD (Kid delf) sized by Luts.
They fit o'kay with socks.

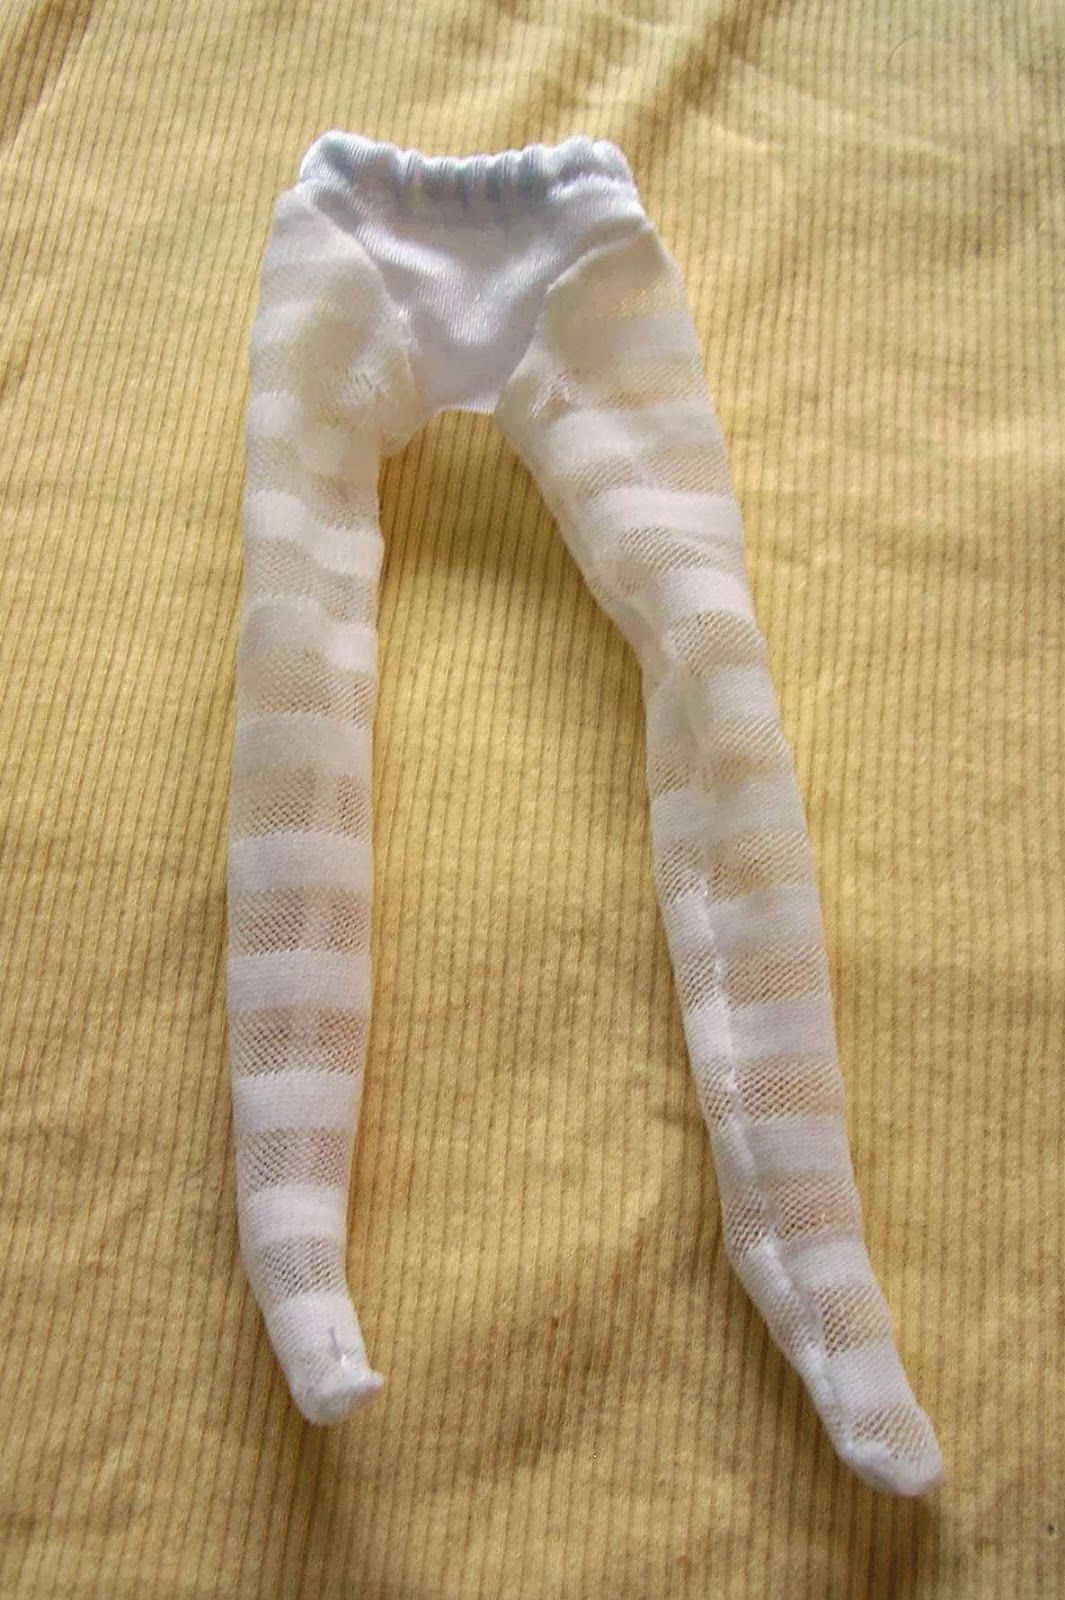
Stockings are from a pattern in an old issue of the Kish Collectors Society newletter.
Seriously if you like Kish dolls join the Society, it's not expensive and the newsletters are lovely.

Tuesday, 11 March 2014

Update (I'm still here!)

Ok, so it looks like I've been a little slack on this blog lately.
The reason is a monster has taken over my lounge room! . . . kind of.
I started building a dollhouse in January of last year and it has slowly spread itself all over the house. And it's still not finished. When it is it will look something like this :

Garfield house by Greenleaf

Except mine won't be that perfect or those colours. Anyway my family gave me an ultimatum "Finish the dollhouse or get rid of it!" So, at the moment sewing has had to be put aside in favour of finishing the dollhouse of my dreams. While I'm on the subject of dollhouses, if you ever think about building a dollhouse first ask yourself what you would rather have sanity, money or a dollhouse. If the answer isn't a dollhouse, don't build a dollhouse.

Anyway I am working on a dress, it's based on this one from the LACMA:


There have been a couple of issues with it. Firstly I changed the way I was attaching the cuffs, halfway through making it and then the sleeves wouldn't fit over the doll's hands. Secondly at the waistline there are triangular areas of smocking on the skirt. I thought "That can't be too hard!" but it turned out that for someone that knows nothing about smocking, it kind of is. Especially if you want it to look good. So I'm pretty sure my final version won't have the smocking.

Anyway, I just have the skirt and the big bow in back left to do and it's finished. So hopefully sometime in the next week and a half I'll manage to get it done while my dollhouse parts are drying and finally get some pictures up.

Monday, 3 February 2014

Wonderland Patience Again!


I restyled Patience's hair into the ringlets I wanted her to have in the first place. I like the way it turned out. Because I washed all the gluey varnishy stuff out of her hair, it's a LOT softer now and prettier. I took these pictures right after I undid her rags, so I hadn't tidied up the ends yet. The frizzy bits on the bottom of the curls are the very ends of her hair, I trimmed them off after I took the pictures. Also if you can see a black smear in her hair - it's ash. I didn't realise it was there until I was cropping the pictures.


Sometimes Patience looks like she's plotting something!

Probably plotting to steal Alice in Lalaloopsyland's rabbit.
 
 The Littlest Pet Shop Peacock always tells Patience the best stories.
 
I also had a play with different clothes.
I discovered that I have no other doll shoes that fit Patience at all. Longer Living Dead Doll outfits fit her but most of them are disturbingly short (which is why I didn't take pictures.). I have a large Alice in Lalaloopsyland doll and thought her dress would look cute on Patience but it was nowhere near long enough, the hem only reached Patience's hips! Some clothes for twelve inch Kish dolls will fit her. But  Patience is both thinner and longer in the body so some clothes won't fit or will just look silly.
But I love Patience in Olivia Primavera'a dress!

Patience is charmed by this dress, but isn't sure if she's a ballerina or a fairy.
 
 Why, hello there!
 
 What an unusual bird!
A bird in the hand is worth. . .
 
I'm not sure yet if I'm going to be making clothes for Patience or not. I really like her original outfit and don't want to change her clothes, but at the same time I keep coming up with other things I could make for her. I probably will eventually but for the moment I'm going just keep her as something to look at. . . until that face gets to me.
 
 PLEASE make me a new dress!!!

Wednesday, 22 January 2014

New doll - Wonderland Patience by Wilde Imagination

Wonderland Patience with Alice in Lalaloopsyland's
white rabbit.
 This is my newest addition, Wonderland Patience by Wilde Imagination. I have always been a fan of Robert Tonner and last year I decided to buy a Robert Tonner doll. Except there were no Tonner dolls available that I actually wanted. I liked a lot of them but simply didn't want them. I thought about buying Maudylynne Macabre but it seemed silly to me to buy her when the postage would have costed more than the doll. 
  And then I stumbled across Garden Patience. Unfortunately I have a rule. If I want to buy something that's over a hundred dollars, I make myself wait at least a week before buying it. (You wouldn't believe how often at the end of the week my response is "Nah, it's great but I don't WANT it.") At the end of the week I went back to order Garden Patience and . . . she was SOLD OUT! I looked around the internet at various doll shops and ebay, and there were some still available but they were twice the original price! I gave up on Garden Patience and instead started checking Wilde Imagination regularly for new dolls. Long story short I got Wonderland Patience!
  I love this doll. (Although the boys in my house have declared her to be the creepiest doll I own.) But there are one or two things I don't like about her. Firstly, I don't know much about strung dolls, but I think the  stringing in my doll's neck is too loose. Unless her head is tilted slightly forward, it tends to flop backwards in a creepy, dead kind of way. And secondly, from the prototype pictures I expected her to have lovely curls, yes I expected them to be shellacked to death, but I expected lovely curls. The curls are shellacked to death but they are not lovely. When she arrived they were flattened and squashed against the back of her head. A few days later they'd fallen down a bit to look like this

Originally all these curls were flattened right against the back of her head.
I tried to tease the curls down into proper curls, but they just started falling out leaving a limp wave. That's the point her hair is at in the pictures. Since then I've washed out the shellac (One of the most disgusting experiences of my life) and brushed out the curls, next I am going to recurl it to see if I can make it be lovely curls. If it works at all I'll show it in another post.
  These disappointments aside, I am completely in love with this dolls articulation! The separate elbow and knee pieces give her a flexibility that most dolls don't have. There is a review of Ahoy Patience on The Toybox Philosopher's blog that goes into her articulation in more detail and I really can't top that. You can find her review here.
  The big difference between this Patience and the other Patience dolls is that Wonderland Patience has rooted hair whilst the others are wigged. I'm not sure if there's a reason for this, whether rooting is cheaper and with a wig she would have gone over budget or if it's because her hair is all swept back off her face and that quite often looks funny in wigs, or if they simply felt like it. But the rooting is nice and the hair fibre (once it's not full of glue) is lovely and soft. Also when I brushed her curls out, almost no hair fell out, even though I wasn't being particularly gentle, which to me is a good sign.


Her outfit is quite detailed. Her apron is white cotton trimmed with broderie anglaise and lace. The key is attached to a red ribbon that is sewn to the apron, just above her pocket. It looks better when the key is tucked inside the pocket but I forgot to get any photos of her like that.


Under her apron her blue dress is fairly plain. It has an attached underskirt of soft, white netting that has lace trim on the lower edge.

Patience without her apron.


 Dress showing the underskirt.
Under her dress she wears a petticoat of some sort of white nylon taffeta. There is an extra frill of netting on the petticoat to make the dress stand out more.
  Petticoat. Unfortunately my camera doesn't like this much white.
Her stockings have a lycra section at the crotch which makes them double as underpants. The legs are a white fishnet with stripes of denser weave, making them white on white striped.


Her shoes are patent "leather", fastening with little bead buttons. These are a lot easier to do up than I expected. Very well made  and adorable.


I love Patience's face. When she's undressed her head does look out of proportion to her body, but in her clothes (particularly because her clothes are so puffy) It actually looks a lot more proportional. There was way too much light in the room on the day when I took these pictures to get any good close ups or even many good pictures. Everything came out with a lot of glare and a white haze. So there won't be the usual amount of photo spam at the end of this post, just two more pictures.


One of the reasons I chose this Patience over the others available, is the natural looking facial colouring.

Because of the weight of her hair and her floppy head issues, 
I had trouble getting her to balance on her own.

Saturday, 18 January 2014

Chiara's Fiesta Dress

Chiara (Kish Song) relaxing in the sun.

I was actually going to do something quite different this time. I had a plan to make Little House on the Prairie style dresses for all my Kish dolls. I spent a whole afternoon making stockings to go under the dresses. But it's a million degrees here at the moment . . . ok, not quite a million but every day this week has been over 40 degrees (that's 105 for those of you who use farenheit.) and the idea of making long sleeve dresses is kind of unmotivating. So instead I made a nice light sundress.

Chiara's (Kish Song) fiesta sundress.
The design is really simple, there are only two pieces; and while some parts can be a little awkward, they're not difficult.
Start by cutting two of the yoke pieces on the fold. The pattern says one but that was a mistake. You need one piece to show and one piece for lining.
Embroider the piece you're using for the outside of the dress. The flowers are :- French knots of pink and orange variegated  thread, surrounded by a circle of running stitch in blue and purple variegated thread, then a ring of lazy daisy stitch in the pink and orange and a further ring of lazy daisy in green and blue variegated thread. The isolated french knots are the blue and purple thread again.

Then cut the skirt pieces, one of each length on the fold. I did a plain hem on the underskirt and hemmed the overskirt with hot pink zigzag stitch on the sewing machine. Hem both pieces and then sew the layers together at the back. Gather across the top edge.
Sandwich the two skirt layers between the two yoke layers (which should be right side in at this point) and stitch together, making sure the points meet on all layers. Turn the yoke layers right side out, turn in the edges and stitch all the way around. At this point I added a layer of topstitch all the way around the yoke in the pink and orange thread.

Finish the back opening and add fastenings and straps. The straps on mine are scraps of white baby ribbon.

The belt is made from embroidery thread. Get six strands of thread in various shades of brown and plait them until the plaited section is long enough to go around the doll's waist. (Leave a fair amount loose at each end.) When it's the correct length tie it off at each end. Cut off one strand of thread at this point at each end. Tie another knot approximately a further inch along the threads and cut off another thread here.
Now you should have a length of embroidery thread that's plaited in the centre with a knot at each end, then a non-plaited section at each end followed by another knot. After the second knot there should be four strands each end. seperate each end into two pieces of two strands and thread each two strand piece through a bead and tie in place. It takes longer to explain than it takes to do.

Chiara tries not to have a brain aneurism trying to understand my belt making instructions.
 
Before she realizes I already made her a belt.


The pattern for Chiara's fiesta dress.

 Rowan (Kish Raven) and Chiara contemplate running away from the crazy belt lady.

The embroidery is done with two strands of Mouline Madeira sticktwist in:-
Orange and pink 2406
Blue and purple 2408
Green and blue 2409 

Saturday, 21 December 2013

Lydia's Starlight Dress

Lydia (Helen Kish's Peyton) with her Zelf friend.

I wanted something spangley and sparkly for Lydia's first outfit as a girl. Something partyish and pretty. What I came up with was a fairly basic design. A simple dress with a round neckline, high waist, puffed sleeves, and full skirt. I added a sheer overskirt and attatched half-sash to make it a little more interesting.
The result:
It may be the pale blue or the long hair with the headband but
the overall look feels a little Alice in Wonderlandish to me.

The sleeves and bodice are actually made from a pair of sequined gloves I found at a junk shop, with the sequins scrubbed off. The bodice is lined in pale blue cotton/poly and the underskirt is of the same fabric. The overskirt is Ivory Crystal Organza with pale blue stitching at the hem. There's also a half sash of blue nylon tying at the back.

I couldn't get a good picture of the sash, so here's a bad one.
This close up you can see where the sequins were, that's not going to wash out.

To make this is simple.
Make up the bodice and bodice lining, if  you're using a lining.
Sew the ends of the sash (If you want one) into the side seams of the bodice.
Sew a casing along the lower edge of each sleeve and thread with hat elastic. (Shirring elastic isn't strong enough and normal elastic is too bulky.)
Gather the overskirt (If you want one) onto the underskirt.
Gather both layers of skirt onto the bodice and sew the back seam.
Add fastenings.

It can be fun experimenting with different sheer fabrics over different fabrics. You don't have to make it white over a colour, or make both layers the same colour. Two different colours can give interesting effects, but check what they look like together before doing all the work.

And now the rest of this post is mainly going to be Lydia/Peyton photo spam.
Her hair is really WAY too long, but I can't decide whether to cut it or curl it, so I'm leaving it until I make up my mind. (Although I did discover long pigtails really don't suit her.)

Lydia (Helen Kish Peyton) looking cute, just before she did a nose-dive
off the table!

It actually wasn't until I saw these pictures that I realized
 how much the blue of her dress brought out her eyes.

Making a wish on a falling star.

 Lydia (Helen Kish Peyton) with her new friend.

 And now the pattern:

Until next time.

Wednesday, 16 October 2013

Rewigging Peyton

I finally got around to rewigging Peyton today (YAY!), and I'm going to show you how I did it just in case you ever want to rewig one of your dolls.
Before I start I will say, particularly if you've never done this before DON'T DO IT UNLESS YOU'RE SURE YOU WANT TO! Seriously. There's a good chance you will ruin the original wig in the process and even if you don't, it may never be quite the same again. Don't take the wigs off unless you know you won't be heartbroken if the original wig ends up unusable!
I don't recommend using any kind of solvents on vinyl. Why? Because a lot of vinyls will absorb solvents, and whilst there may be no visible effects at the time, often  they will cause the vinyl to degrade faster than it otherwise would. So if I'm not sure I don't use it.
I also don't recommend using craft knives to cut away the glue. It's tempting, but there's also a very realistic danger of slipping and ending up with the blade buried in the doll's face, or your hand.

I use a teaspoon. Yep, a teaspoon. Not solvents, no water, no knives. Just a teaspoon. And it takes about twenty minutes.
Start by looking around the edge of the wig. Usually somewhere toward the back you'll see a loose spot.

Slowly (this is the slowest part) work the teaspoon under the loose spot.


Once you can get the tip of the teaspoon under the edge, start working it around to either side.


Getting to the point in the above photo is the slowest part. Once you're that far just keep going and soon you'll be here :


And once you're that far you can usually just pull the wig off.
And then you have this:


Just for fun once I had my bald Peyton, I tried on all the wigs I had on hand (three) and here are the results:

Brunette Peyton with a fringe that was apparently cut with a lawn mower.
Wig is Dark Brown Dani wig by Monique in size 6-7

Blonde Peyton. I can't decide if I love this look or hate it.
Wig is Luts wig CDW-21 in Sweety Gold in size 6-7

And of course red head Peyton. I know I love this!
Wig is Luts wig CDW-21 in Carrot in size 6-7

The next part is attaching the wig. I don't normally do this part. My Lark has been rewigged but because her wig is a size 6-6.5 it's very snug, so it can be styled and fiddled with, without any danger of falling off. This wig is a little bigger, and Peyton's head is a little smaller, so I decided to glue it down.

Firstly make sure you have a clean work surface and a damp cloth handy.
Then plait or bundle up the hair and turning the wig-cap inside out, stuff the hair inside.


This makes it easier to see what you're doing, and stops the hair from getting stuck under the wig, or getting glue in it.
Now put glue on the doll's head, not the wig. I used ordinary PVA. I wouldn't expect it to hold up to a child playing with a doll, but for my doll which won't be played with and will only be getting occasional gentle styling, it shouldn't matter. 


Don't be overly heavy handed with the glue. If you use too much it will seep through the wig cap and make a mess of the hair.
Next spread the glue over the doll's head with your finger.


Wipe away any excess with a damp cloth and clean your fingers before you put the wig on.
Position the wig by putting the front hairline where you want it and then working around to the rest of the wig.


Her hair is still tied back, now she is drying on a shelf. Make sure it's some where nobody is going to pick her up or knock her over until she's dry.

Once her wig has dried, I'll be making her a new dress. A girly, sparkly, party dress.